Tuesday, July 24, 2012

Hippie Tie-Dye Nails

...groovy.
~~What I Used~~China Glaze: Boy Toy Blue, Kiwi Cool-Ada, Pool Party and Yellow Polka Dot Bikini~~Milani: Dreamy Creme ~~ Sally Hansen: Double Duty Base & Top Coat~~
The brighter the colors, the better this will turn out. Also, since you will use a lot of paint on each nail, fast-drying nail polish will work best. China Glaze is super fast-drying. :)

After applying your base coat, paint all of your nails with a thin coat of white. I used a pearly white.
This will allow the colors on top to dry brighter.
Add a thick drop of each color onto your nail. 
Using a toothpick or dotting tool, quickly swirl the colors together making sure all of the white paint on your nail is covered.  You may need to add more color to edges that aren't being filled in.
Play with the colors until you are happy with it, but paint drys fast so be swift! :)
Allow at least 10 minutes for your nails to dry before applying your top coat...and you're done! Far out!


Wednesday, July 11, 2012

Cookie Monster Nails


ME WANT COOKIE! 


What I Used
China Glaze: Boy Toy Blue
Opi: Black Onyx
Sally Hansen: Hard to Get (white)
Sally Hansen: Honey Whip
Sally Hansen: Double Duty Base and Top Coat
Dark brown acrylic paint
Fine nail art brush
Dotting tools


After applying your base coat, paint the tips of your middle finger
and thumb nails 'cookie monster' blue.
Paint a half circle shape and make sure to cover all of the white part of your nails.
Using a dotting tool, add two large, black dots to represent the eyes.
The dots should slightly overlap each other...
and be half on top of the blue and half on top of your clear nail.
Add two white dots inside the black dots.
You want the black dots to outline the whites of the eyes.
Add two more small, black dots inside the white dots for the pupils.
They should not be straight.
Give your cookie monster wild-looking eyes.
Looking at a picture of him will help you see how his pupils are placed.
Next, draw a big, wide smile using a fine nail art brush and black polish or acrylic paint.
The smile should be wider than the eyes and should be in a half-circle shape.
On the other three nails, paint the tips the same as you did with the blue,
but with a tan color polish.
Make sure to cover all the white of your nails.
Last, using a dotting tool, add random dark brown dots to your cookies...
apply your top coat and you're done!
Nom, Nom, Nom....


Tuesday, July 3, 2012

Fourth of July Nails

Happy Independence Day, USA! 


What I Used:
China Glaze: Boy Toy Blue
Milani: White Canvas
Red Acrylic Paint
Dotting tools
Fine nail art brush
After applying your base coat, paint all of your nails white.
Paint two red stripes on each side of your nails.


Paint the tips of your nails blue.
You may want to use acrylic paint so the red doesn't bleed through.
If you don't have acrylic paint, re-paint the tips white, then paint the blue on top.
Using a dotting tool, add random white dots on top of the blue tips to represent the stars.
Apply your clear top coat...and you're done!

Saturday, June 23, 2012

Cherry Blossom Nails (Arizona Tea-Inspired)


What I Used: 


Sally Hansen Double Duty Base and Top Coat
Opi: Black Onyx
China Glaze: Fuchsia Fanatic, 
Dance Baby, Kinetic Candy
Fine nail art brush
Dotting tools


After allowing your base coat to dry, paint all of your nails with a light blue or green.
I used 'Kinetic Candy' from China Glaze.

Next, draw thin branches using black polish and a fine nail art brush.
Try to make each nail unique from the other.
Using a dotting tool, add 5 or 6 dark pink dots randomly on the branches.
Next, add 4 or 5 light pink dots to the branches.
You will want to overlap a couple of the dark pink dots with the light pink dots.
Last, add very small black lines (for the stamens) inside the light pink dots, apply your top coat and you're done!

Sunday, June 17, 2012

Zipper Nails

 What I Used: 

China Glaze: Gothic Lolita
and Sweet Hook
Milani: White Canvas
Sally Hanson: Double Duty 
Base and Top Coat
Fine nail art brush


After applying your base coat, paint all of your nails light purple. You can use any light color you like.
Using a fine nail art brush and a darker color purple, paint thin lines in the shape of an acute triangle. Place them differently on each nail for effect.
Fill in the triangle and add two white dashes at the end of your triangle to begin the zipper.
Paint parallel white dashes all the way to the end of each side of the triangle.
Add a small, white, right-angle triangle between the two sides of the zipper, like above.
Last, add a rectangle connected to the small, white triangle.
Apply your top coat and you  got zippers on your nails!


Thursday, June 14, 2012

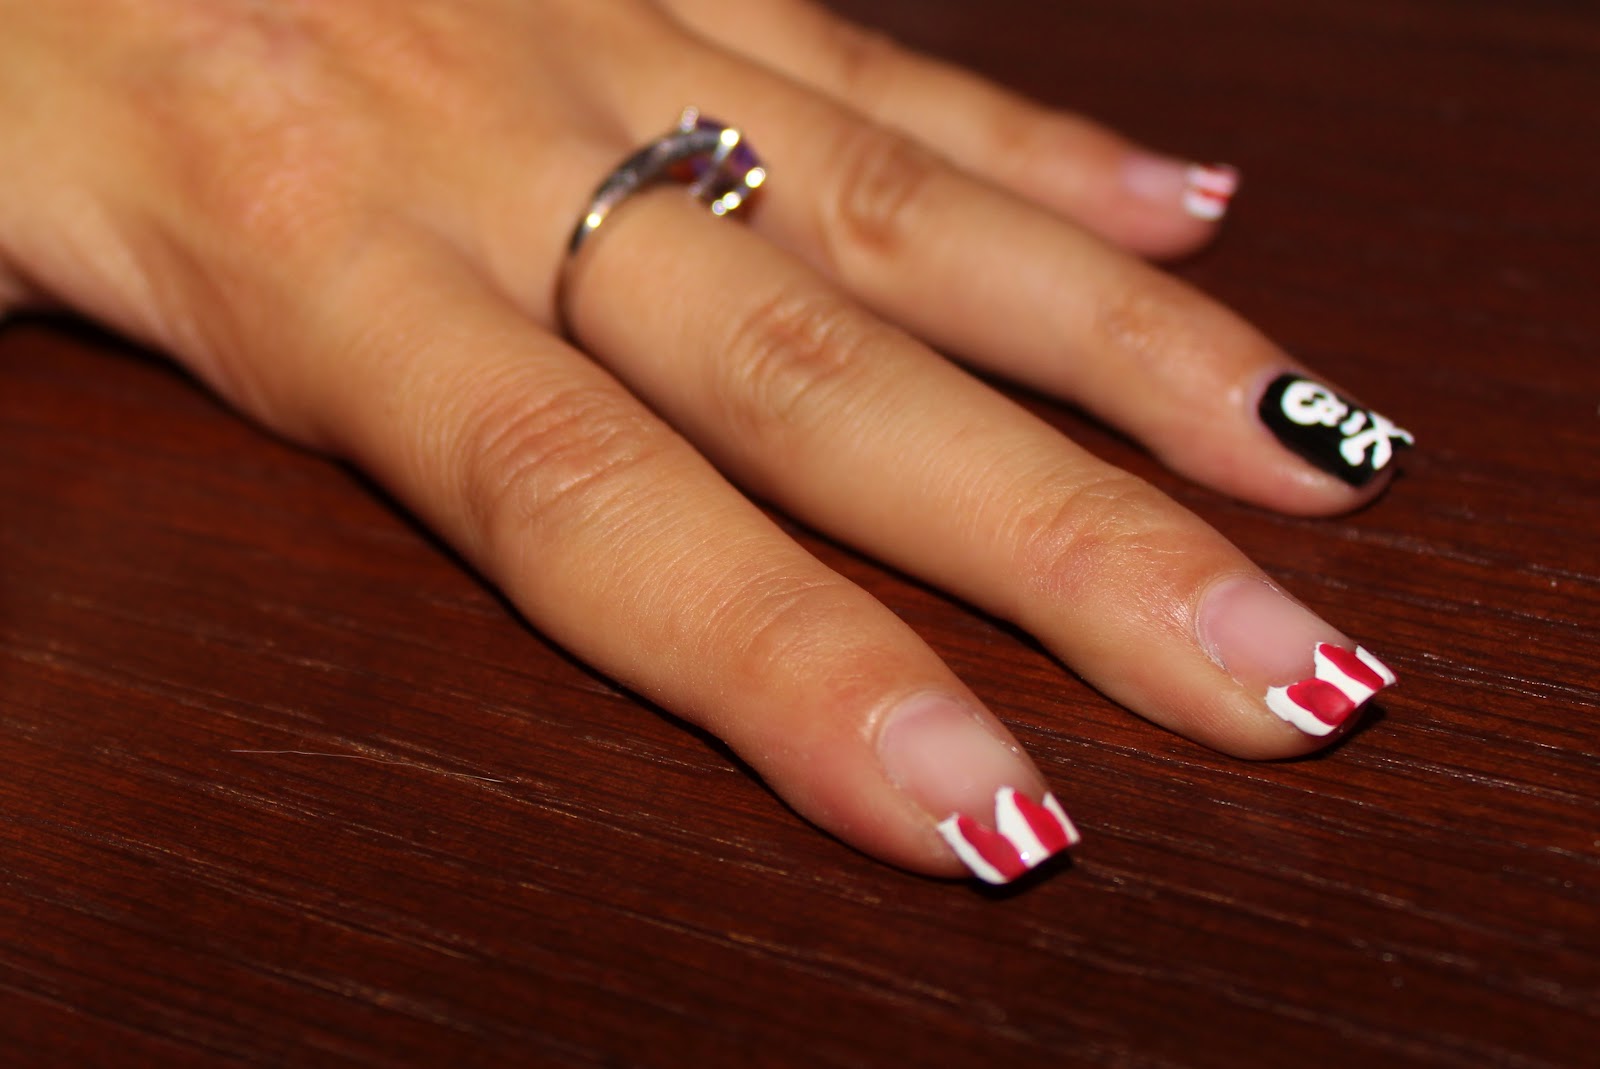
Pirate / Skull & Crossbone Nails


What I Used: 
Opi: Black Onyx
Milani: White Canvas
Red Acrylic Paint 
(because the only polish color I 
don't own happens to be the 
most common nail polish color)
& a fine nail art brush

After applying your base coat, paint your thumb and ring finger black.
Paint the other three fingers using white nail polish. You will want to make jagged lines to look a lot like a cracked egg. Make sure you cover all of the white part of your nails with white polish.
On your two black fingernails, paint the head of the skull first with white polish. You can start by painting a circle and then add an oval to the bottom of the circle to represent the nose area. Next, paint a curved line under the head (without touching the head) to represent the jaw of your skull. Remember to allow as much space as possible to the bottom of your nail for the bones.
Paint two straight lines that intersect each other for the crossbones. Then add two small circles using a dotting tool to the ends of each line. You will want to overlap the two circles to get the bone-effect.
Using a dotting tool, add two black dots for the eyes and one smaller dot for the nose.
Now, back to the other three fingers. Using red polish or acrylic paint,
paint three red lines within the white you already painted on the tips of your nails.
Last (and this is the hardest part), outline the jagged edges with black for that clean look. Apply your clear top coat and you will have a great excuse to 'Arrrgh' all day at people. :)

Friday, June 1, 2012

Pink Floyd / Dark Side of the Moon Nails


Far away across the field
The tolling of the iron bell 

Calls the faithful to their knees 
To hear the softly spoken magic spells.."
- Dark Side of the Moon
What I Used: 
Very fine nail art brushes
Sally Hanson: Double Duty Top & Base Coat
Opi: Black Onyx 
Milani: White Canvas 
China Glaze: Fuchsia Fanatic, Sun Worshipper, Yellow Polka Dot Bikini, Kiwi Cool-Ada, Kinetic Candy, Gothic Lolita
After applying your base coat, paint all of your nails black.

Paint a white triangle on your middle finger.
Next, paint a curved white line that moves towards your index finger.
On your index finger, paint a thin, white line with a slight downwards slant...towards your thumb.
In order to get the most out of the lighter colors in the rainbow, paint your nails white where you want the rainbow to be. You want them to look like they are connected (flowing together) as much as possible. You will need to do this on the middle, ring and pinky fingers (like the above picture). The white paint should increase in width from the triangle to the ring finger, to the pinky finger. It helps to look at the actual album cover to see how the rainbow gets wider the further it is from the triangle.
The hardest and most tedious part are the individual colors of the rainbow. You need the lines to be as thin and straight as possible. Practice on a piece of paper first. If you think you have a fine, nail art brush, you don't. It may help to cut some of the strands to make it even thinner. Start with red and work your way down the rainbow. Notice how the blue on the album cover is much lighter than the rest of the colors. ;) It makes a small difference.
After you get through rainbow hell, apply the top coat and you're finally done.
These nails are cool. Everyone will be impressed. :)